Showing posts with label ballast. Show all posts

Wednesday, September 21, 2022

Archiving a few old pictures

I am just using this post as a kind of archive, holding old photos that will otherwise become lost when I in the near future discontinue my personal domain.

A photo of a ballast comparison I did for an N scale layout back in 2010.


Some photos relating to a weathering challenge held in 2015.


Sunday, March 6, 2022

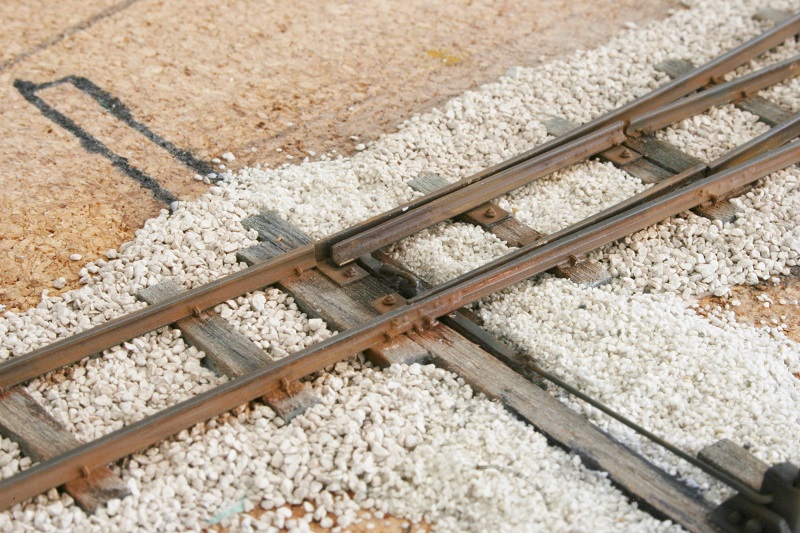
Ballasting done

The next obvious step was of course ballasting. Now done, although weeds and grass will later be added.

As for size comparison. Although this is O scale but 2 ft gauge the model rail gauge is 12.7 mm which is right in between H0 and N scale. Rail is code 70.


In the last picture, note the Sunday dinner chicken in the upper right corner 😀

Tuesday, July 21, 2015

Ballasting, part 2

Not much progress since last, but I have done some more ballasting. When doing that I reached two of the ties which I had weathered to look like new ties, recently replaced. I wanted the ballast around those ties to also look new and fresh. The problem was I did not have any such ballast, suitable for O scale.

Then I thought I should test to do some ballast from what I had at hand. So I took some of the rubble I mentioned in the previous post, the stuff I collected when they where laying the slabs for our patio. It is some kind of crushed rock, of all possible sizes, ranging from dust to pebbles about 1/4 inch. I put some of it in a strainer, like this,


...and sifted it. Everything that could get through the mesh was gone. That left me we just the larger pieces...


...which I then poured into a colander, with holes slightly larger than the holes in the strainer mesh.


Shaking the colander made the smallest pebbles fall through and into the bowl below.


Voilá, my O scale ballast of crushed stones!

I applied that ballast, directly from the quarry, around the new ties.


Looking rather good, if I may say so myself.

P.S. The strainer and the colander were taken from the kitchen. Washed after use, with no one the wiser.

Saturday, January 19, 2013

Ballasting continues

With the mainline ballasted in a traditional way, displaying a relatively well manicured right of way, it was time to the turn the attention to the yard and drill tracks. Here I wanted a more unkempt look, with dirt rather than rock ballast. So I decided to give tile grout a try.

I did some tests and decided to go with a mix of 50% grout and 50% N scale ballast. To use only grout, which is much like a fine powder, was more or less impossible. It gave you nearly no control, and the stuff ended up everywhere. A mix of ballast and grout was easier to control, but still gave a dirt look. Here is a picture of a spur ballasted withe the grout and ballast mix (the middle track). The mix is kept in place with a water and white glue mix.


Once the glue had dried I applied weathering powders to obtain a dirt look. I also used some rust powder along the rails, and some black powder in between the rails, simulating oil and whatnot. I gave the mainline a light rust and oil treatment as well.


And a close up...


The dirt is a little to brown maybe. I'll aim for a slightly more gray tone when I do the next stretch of track.

Friday, January 4, 2013

Ballasting the main


I wanted at least some parts of the layout to become more complete, so I decided to ballast the main line. Part of the decision was also an urge to test the Minitec H0 Phonolith ballast, which I purchased some time ago.

But before ballasting I actually did scenic the narrow stretches of right-of-way along the actual track. So far, on previous layouts, I have always ballasted first and done the scenicing next, so this was a new approach for me. Some people say this yields better results, and besides this is how it is done in real life. I would not say that the difference, as compared to doing it in the opposite order, is very dramatic, but yes, maybe ballasting on top of the surroundings gives slightly better looking end result.

Anyway, I started by adding gravel along the outsides of the sub-road bed, and ground foam and static grass along the layout edge. I also added some vegetation that climbs on the retaining wall. I did all this using the true and proven standard method: apply a layer of white glue; spread the material; wet with alcohol; soak with a water and glue mix. The gravel is actually some N scale ballast (from Minitec). Here is a picture.


Next I added ballast. I used Minitec H0 Gleisschotter Phonolith. Gleisschotter is German and simply means track ballast. Phonolith is the kind of rock it emulates. Below is a picture where some of the track has been ballasted and some not.


Here is a closer look, where I also tried to add an old cardboard box, so that things would not look that neat.


In this last picture I wanted to show that with the CVC tie strips it possible to actually get a gap between the bottom of the rails and the ballast. Something that normally is not possible with flex track. Looks nice I think, but if you don't know the gap is there, you will probably never notice. But since I know...