Sunday, September 9, 2012

Photo container

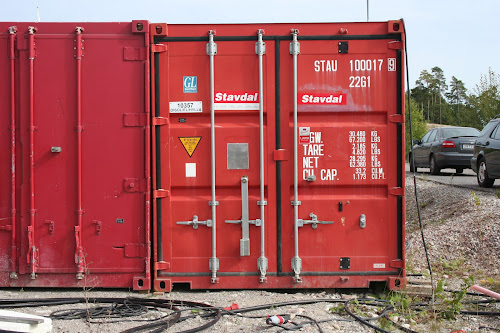
Inspired by Lance Mindheim, I sat to build some containers from styrene and photos of actual containers. The first thing to do was of course to get some photos, and this time I did not have to look far since a couple of days ago a pair of 20 ft containers were put down at a construction site near my home. Today I went there to take some photos. Here is one of them.


Once back home I fired up an image processing program on my computer (GIMP 2, a freeware program). Using its "perspective" tool I made the container images square. I then, after some struggling with the software, managed to print them in the correct H0 size.

I then built a container sized box from 1mm sheet styrene. Here is the box, and some of the printed and photos, cut to size.


Then all that was left was to glue the photos to the box, like this.


I could do some adjustments at the corners, where the photos partly overlap, but apart from that I think it came out nicely.

Edit: I could also have used better paper and printed at a higher resolution. Now I used ordinary letter paper and standard "everyday" printing settings.


Sunday, September 2, 2012

Track Weathering, part 2

Today I tried to fade the red and yellow tones on the ties. I used a mix of  white and ultra-marine, which I dry brushed on the ties. Looks better I think. A more aged look.


So now I can proceed and spray and weather the rest of the track - about 99% more than this little test stretch.

Saturday, September 1, 2012

Track Weathering

I have done some experimenting with track weathering. I started by spray painting the track a brown color, using a spray can. It was not a carefully selected color. Just a can I happened to find in a nearby store. It was a rather light reddish brown, so I also toned everything down with a light spray of flat black. This is what the track looked like after that treatment.


I then tried different ways, and different kind of colors, to get a more aged and rusty look. I think my best attempt so far was with some oil paints, ochre and burnt sienna. Using a flat and thin brush I applied ochre to the tie plates, and dry brushed ochre and burnt sienna to the ties. I then smeared everything with my finger. The rail sides also got some more color.


Perhaps still a little to much on the red and yellow side. At the next attempt I will maybe try to add some white and ultra-marine. At this time I decided to press on and to see what it would like with ballast in place. So I added some (N scale) ballast, but did not secure it.


It seems I have a fibre or something on my camera lens. Need to get rid of that!

EDIT September 19, 2022: I did finally get rid of the "thing" in the camera sometime during spring of 2022. 😀