Where the siding ends I also constructed a poor man's bumber out of two ties.
Friday, July 24, 2015
Ballasting the Siding
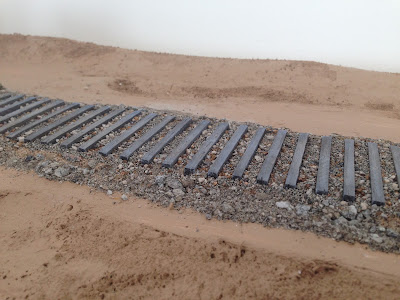
Once the main was all ballasted I turned to the siding. When I did the turnout I ballasted the diverging route with Arizina Rock and Mineral's steam era yard mix, which is supposed to be some kind of cinders I assume. Anyway, I continued with the same ballast along the siding. With some N scale cinder ballast mixed in for good measure.
Where the siding ends I also constructed a poor man's bumber out of two ties.
Where the siding ends I also constructed a poor man's bumber out of two ties.
More Hoppers
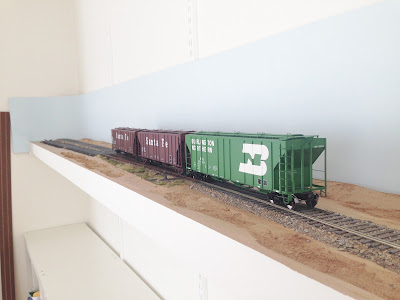
The lone hopper I have is no longer that lonely. It now enjoys the company of two more hoppers of the same kind. One of the guys on the Railwire forum was kind enough to offer them at a good price.
So here is the entire fleet:
The rails which the BN car sits on are just loose rails temporary laid there for this photo.
So here is the entire fleet:
Tuesday, July 21, 2015
Ballasting, part 2
Not much progress since last, but I have done some more ballasting. When doing that I reached two of the ties which I had weathered to look like new ties, recently replaced. I wanted the ballast around those ties to also look new and fresh. The problem was I did not have any such ballast, suitable for O scale.
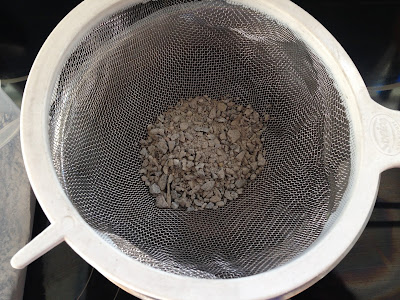
Then I thought I should test to do some ballast from what I had at hand. So I took some of the rubble I mentioned in the previous post, the stuff I collected when they where laying the slabs for our patio. It is some kind of crushed rock, of all possible sizes, ranging from dust to pebbles about 1/4 inch. I put some of it in a strainer, like this,
...and sifted it. Everything that could get through the mesh was gone. That left me we just the larger pieces...
...which I then poured into a colander, with holes slightly larger than the holes in the strainer mesh.
Shaking the colander made the smallest pebbles fall through and into the bowl below.
Voilá, my O scale ballast of crushed stones!
I applied that ballast, directly from the quarry, around the new ties.
Looking rather good, if I may say so myself.
P.S. The strainer and the colander were taken from the kitchen. Washed after use, with no one the wiser.
Then I thought I should test to do some ballast from what I had at hand. So I took some of the rubble I mentioned in the previous post, the stuff I collected when they where laying the slabs for our patio. It is some kind of crushed rock, of all possible sizes, ranging from dust to pebbles about 1/4 inch. I put some of it in a strainer, like this,
Shaking the colander made the smallest pebbles fall through and into the bowl below.
I applied that ballast, directly from the quarry, around the new ties.
P.S. The strainer and the colander were taken from the kitchen. Washed after use, with no one the wiser.
Thursday, July 16, 2015
Ballasting, part 1
I have started to ballast the track. I used a few different materials in order avoid getting things to uniform. I imagine that a small outback operation, while not neglecting its trackage, used what was at hand or could be obtained at a reasonable prize, rather by going for a standard "by-the-rule-book" ballast. Thus, when topping off with additional ballast they could have been using a completely different material than the previous time. At least that is what I pretend has been the case here.
Here is what I used
1 - Rubble I collected when they where laying the slabs for our patio. Not the sand for the actual setting bed, but what went under that. It is crushed rock in a variety of sizes.
2 - Sand from a children's sandbox, if I remember correctly.
3 - Model railroad ballast, from Arizona Rock & Mineral. This is their large scale PRR Light Gray ballast. I bought it when I built the turnout around which this layout is built. I think the stones are a little to large, and also to rounded. To use only this material gave the whole thing a kind of whimsical look. At least in my eyes. That is the reason I started to blend it with other stuff (and invented the story above to go with it).
4 - Some more model railroad ballast, this time HO ballast from a German company called minitec. Unfortunately they have gone out of business. To bad, since they did great ballast. N scale too.
I first applied the crushed rock along the outside of the bitumen subroadbed. This is more or less just a filler, since most of it will probably by obscured by other scenic material (grass, weeds etc.). But if any of it sticks up it could give a nice effect.
Then I put done a layer of the sandbox sand between the ties. This is also more or less a filler, and serves the purpose of hiding the bitumen below, should there be any gaps in the layers above.
Next came the ballast from Az Rock & Mineral, topped off with some minitec ballast. Here is a picture showing the various steps:
And a side view:
To fix things in place I used the standard method - wet with alcohol and then soak with a mix of white glue and water. When dry it looks like this:
This was the first stretch of the main, so on to the rest! After that it is time to deal with the spur/siding, which will get a slightly different treatment. More about that later.
Wednesday, July 15, 2015
Basic Landscaping
Ballasting got postponed some. I did not want any of the pink foam to show under the edges of the ballast, so I needed to apply some basic paint first. But before I could paint I needed to create the basic landforms. Not that there should be any dramatic forms on this layout, but I did not want it to be entirely flat either.
So I removed foam in places and added foam in others. The latter at the back, along the backdrop. This also helps in making the transition from the layout itself to the backdrop less apparent.
After some spackling and sanding I then painted the whole thing with a tan acrylic paint. Great overall improvement, as always when you do this step. But at least I get equally surprised every time.
So I removed foam in places and added foam in others. The latter at the back, along the backdrop. This also helps in making the transition from the layout itself to the backdrop less apparent.
Sunday, July 12, 2015
Tie Replacements
Jon (a.k.a. central.vermont) over at the Railwire forum suggested I should have a couple of ties look like they are close to new creosote, like they just changed out a couple. Nice idea, I thought, and once I was done weathering all the ties I went back and pried a few of them loose...
... and glued new ones in their place. Two of them here, and the other two in two other spots.
I then applied a tar colored stain I had around, but I guess any dark brown, close to black, stain or wash would do. I applied it generously to get a dark creosote like look. I also dry-brushed on a yellow and red mix of oil paints to simulate excess creosote oozing out (or whatever it is that gives the ties that orange look in places). Here is what I ended up with.
Now I consider myself done with the ties and can proceed with track laying, but since I am still waiting for a shipment of parts, tie plates among others, that has to wait. Instead I think I will do the ballasting. I know people who hand lay track often do the ballast before the track, but it will be a new experience for me.
Friday, July 10, 2015
Tie Weathering, part 3
The next and last step in the tie weathering process was to go for that sun bleached look. I did that using a trick I think I picked up somewhere on the Proto:87 Stores web page, but that was before it got its new look. Anyway, the advice was to use oil paints, namely a mix of Titanium White and Ultramarine Blue. More of the former and less of the latter. Do not make an even mix, but more of a "hotchpotch", like this.
Then I sort of dry-brushed this on top of the ties, with a quite stiff brush. After which I smeared it out with a piece of cloth, which also got rid of any excess. I also highlighted the ends of the ties with the same kind of dry-brushing.
Once the track has been laid, and rust is applied to the track and the tie plates, the ties will also get its share of rust coloring. But that is later...
Thursday, July 9, 2015
Tie Weathering, part 2
I have applied one more wash to the ties, this time brown with some yellow mixed in. The purpose being to kill the somewhat greenish effect of the dry and diluted India Ink, and also to simply create an overall color variation. Once again, I used nothing fancy but what I had at hand - light brown hobby acrylics and yellow from a children's watercolor set, mixed in plain tap water. Here is what it looks when just applied.
And when having dried. On purpose, the effect is quite subtle.
Tuesday, July 7, 2015
Starting to Weather the Ties
Today I started weathering the battered up ties, by giving them a wash of India Ink. I mixed the ink with plain tap water. No reason to go fancy with alcohol or similar stuff.
I made the mixed rather dark (whatever that is?). Which does not mean I took very much of the ink. You need always go easy with India Ink, and you'd better test on a loose tie before applying the wash to the "real" ties. Below is a comparison of some freshly washed ties (bottom of picture) and some that have had the time to dry for a few minutes. You can see that they turn lighter as they dry.
I also had the time to lay, sand and "scratch" the ties on the other side of the turnout.
I made the mixed rather dark (whatever that is?). Which does not mean I took very much of the ink. You need always go easy with India Ink, and you'd better test on a loose tie before applying the wash to the "real" ties. Below is a comparison of some freshly washed ties (bottom of picture) and some that have had the time to dry for a few minutes. You can see that they turn lighter as they dry.
And here is what it looks like after a few hours. But this is only the base coat. I will come back and add other shades.I also had the time to lay, sand and "scratch" the ties on the other side of the turnout.
Sunday, July 5, 2015
Distressing Ties
Before moving ahead the ties need to be leveled. They are not all exactly the same height and the gluing might also have set them at slightly different levels. So for the track to be properly seated they need some sanding.
An easy way to determine when you are done sanding, and all the ties are at the same level, is to use the old pencil mark trick. Using an ordinary pencil draw a light line along the middle of the ties. Like this
Now, using a sanding block and a medium grit sanding paper (I used a #120 paper) sand away until the line has just disappeared from all the ties. Do not sand the ties on by one but use long strokes, covering a larger number of ties in each move. Here I am nearly done but need a few more strokes.
Then I added cracks and scores using an X-Acto knife with a not to sharp blade. You want a random pattern and each tie to be unique, and that is not easy. You have to deliberately concentrate to avoid repeating yourself. I do not say I am good at that but here is a sample of what I ended up with.
An easy way to determine when you are done sanding, and all the ties are at the same level, is to use the old pencil mark trick. Using an ordinary pencil draw a light line along the middle of the ties. Like this
Now when we have a set of nice and smooth ties it is time to rough them up, to get that old and battered look. First I created a general grain pattern by dragging a fine razor saw along the top of each tie.
Saturday, July 4, 2015
Making and Laying Ties
With the roadbed in place it was time to start cutting ties. I had already got myself a stockpile of 4mm x 4mm basswood strips. When I built the turnout I used pine strips, since at that time I could not locate any basswood here in Sweden. The pine was a hassle since it was to hard for driving spikes into, and every spike needed pre-drilling. I did not want to do that again, and luckily I eventually managed to locate a guy that ripped and sold his own basswood strips. I think they will work much better.
Anyway, I needed a little more than 500 ties so I brought out my NWSL Chopper and started to cut away.
and after about an hour it was all done
The next step would of course be to glue down the ties on the roadbed. When building the turnout I downloaded a turnout template from Fast Tracks, printed it and used as a template when laying the ties and the track. Now I did however not want to glue paper on top of the bitumen since I was afraid that the glue and the paper would in some way form a seal and turn the bitumen into a sound box. The opposite of why I used the bitumen in the first place.
I still printed a section of a Fast Tracks turnout template but cut it in half length-wise. I then pinned one half on each side of the bitumen roadbed, like this:
I could then easily locate each tie, using the paper templates as an aiming tool. I spread white glue on the roadbed with a brush, and then simply put each tie down in the glue, one by one.
When I reached the end of the templates, I just repositioned them further down and continued from there. A little extra care was needed when the roadbed curved, since the ties had to be spaced further apart on the outer side of the curve.
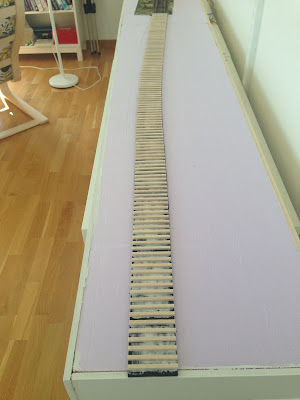
Soon enough all ties had been laid for the first stretch of track.
Anyway, I needed a little more than 500 ties so I brought out my NWSL Chopper and started to cut away.
I still printed a section of a Fast Tracks turnout template but cut it in half length-wise. I then pinned one half on each side of the bitumen roadbed, like this:
When I reached the end of the templates, I just repositioned them further down and continued from there. A little extra care was needed when the roadbed curved, since the ties had to be spaced further apart on the outer side of the curve.
Wednesday, July 1, 2015
Laying Bitumen Roadbed
The next step was to install the the turnout assembly. It needed to come down a bit into the foam, so that the turnout track and the new track will end up at the same level. After some work with a saw, a utility knife and some sanding paper I arrived at this.
The turnout assembly in place.
With the turnout finally where it belongs, and the track at the correct level, I proceeded by cutting bitumen mats into strips, the width of a tie (I wrote about the bitumen mats in a previous post). The bitumen is self-adhesive and it stuck fine to the foam.
Subscribe to:
Comments (Atom)


