

A blog about my model train adventures
Sunday, April 24, 2016

Monday, April 18, 2016
A longer fence
I have built a longer fence, and put it down more permanently on the layout. This time I also made an attempt to at making nails. I tested various ways of doing this but ended up simply making a mark with a pencil. Here are some pictures.


The grass, which I though would be suitable for O, looks to thick I think.


The grass, which I though would be suitable for O, looks to thick I think.
Sunday, April 10, 2016
A wooden fence
Today I built myself a short wooden fence. As with the stone walls I did a while back I'm testing methods. The intention being that there will be stretches of fences and walls along the track, towards the backdrop.
Since the boards making up an O scale fence are quite wide,and at the same time very thin, I found it hard to find any scale lumber that would do. If it was wide enough it was way to thick. What I eventually did was to get some 0.4 mm (1/64 in) plywood, which I would to cut into 4 mm (5/32 in) wide boards.
So let's start. Here is the plywood where I have cut off 40 mm bit, corresponding to the height of the fence, which would be about 2 scale meters (about 6 ft).

Next I used my NWSL Chopper to cut the plywood into individual boards. First I did not see that the Chopper's stop had a tendency to not stay put, making some of the boards too wide. Easily avoided once I had realized that this happened, but it made slowed down the whole process.

Also, the razor blade was a little to short, so the Chopper would no cut the complete length of the boards. But that was easily fixed with an X-Acto knife.

Once all the boards for my test fence had been cut, I soaked them in an India ink wash, along with the scale lumber I was to use for posts and supports. Here are the boards, once dry out of the wash.

I then laid out a simple jig, along with the horizontal support boards, and began gluing boards to the supports.
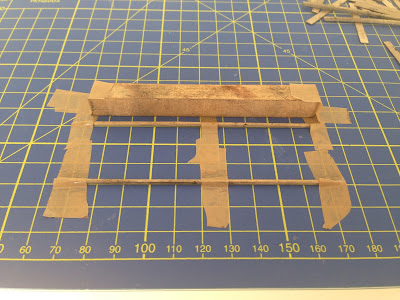
Soon they were all in place, along with two vertical posts.

When the glue had tried it was time to pose the fence on the layout.


Not that bad I think. And there are no more excuses for not building longer stretches of both fencing and stone walls.
Since the boards making up an O scale fence are quite wide,and at the same time very thin, I found it hard to find any scale lumber that would do. If it was wide enough it was way to thick. What I eventually did was to get some 0.4 mm (1/64 in) plywood, which I would to cut into 4 mm (5/32 in) wide boards.
So let's start. Here is the plywood where I have cut off 40 mm bit, corresponding to the height of the fence, which would be about 2 scale meters (about 6 ft).


Sunday, April 3, 2016
All rail done
Finally I have managed to get all rail painted and weathered. Some new pics.


With that all done I hope to get started on some scenicking, or car or engine detailing...
Sunday, January 31, 2016
Stone wall, part 3
The stone wall I showed in the previous post have stones that looks merely stacked on top of each other. Although that can certainly be the case in the real world, at least in older times, I wanted to try a wall with mortar between the stones.
So I sat ought to do a short test section in the same way as before, but now with spackling compound between the stones. I went about more or less as you would apply mortar between real stones.
Once the compound had dried I proceeded as with the previous wall with an India Ink wash, some additional colouring and last some moss. Here is the finished wall.

And for comparison, alongside the one without mortar.

The second one is OK as well. It's just different. But I think I like the first one better. But of course, it all depends on what kind of wall you want to replicate and what fits the rest of the scenery.
So I sat ought to do a short test section in the same way as before, but now with spackling compound between the stones. I went about more or less as you would apply mortar between real stones.
Once the compound had dried I proceeded as with the previous wall with an India Ink wash, some additional colouring and last some moss. Here is the finished wall.


Saturday, January 23, 2016
Stone wall, part 2
I finished my stone wall test today.

I first gave it a somewhat uneven India Ink wash, followed by some dry brushing - gray, concrete and brown colors. After this I sprayed the wall with Testors Dullcote.
I wanted part of the wall to be overgrown with moss. For moss I used Woodland Scenics T49 Blended Turf - Green Blend. I applied white glue with a small brush where I wanted the moss, and then sprinkled on the turf. I then immediately shook and blew the excess turf away.
I'm really happy with the result.


I wanted part of the wall to be overgrown with moss. For moss I used Woodland Scenics T49 Blended Turf - Green Blend. I applied white glue with a small brush where I wanted the moss, and then sprinkled on the turf. I then immediately shook and blew the excess turf away.
I'm really happy with the result.


Sunday, January 10, 2016
Stone wall test
I wanted to model a stone wall, with moss and lichen. I could think of a number of ways of doing this, and buying a ready-made casting was not one of them. What I could do was to for instance:


- Do a simple plaster casting and scribe a stone pattern on to it
- Scribe or imprint a stone pattern in a piece of extruded foam
- Build the wall from individual stones
I've done the first two in other (N scale) projects so I settled for the last one. Might (perhaps) be doable in O scale, which as you know is the scale for my current layout.
First I got myself a bunch of O scale stones. I made them from a flake of not yet cured plaster which I first scribed and broke into strips. The strips where then cut up into more or less rectangular stones. Like this:

I then built a support structure from styrene...

...on which I then stacked the stones and secured them with ordinary white glue. I applied the glue in the back, towards the support only, since I did not want any glue on the visible parts of the stones. Any glue on the stones would ruin any later staining. Here four rows of stones are in place:

And finally we are done:

I admit, the resulting surface is a little on the uneven and rough side. A real stone layer, working with cut stones, and producing a result like this would most probably have got sacked! But for a first test I think it came out quite nice.
Here is a shot with the wall on the layout. The height of the wall is about 1.5 scale meters (a little less than 5 feet).

Next up is staining and painting, followed by the application of lichen and moss.
Subscribe to:
Posts (Atom)