Saturday, July 4, 2015

Making and Laying Ties

With the roadbed in place it was time to start cutting ties. I had already got myself a stockpile of 4mm x 4mm basswood strips. When I built the turnout I used pine strips, since at that time I could not locate any basswood here in Sweden. The pine was a hassle since it was to hard for driving spikes into, and every spike needed pre-drilling. I did not want to do that again, and luckily I eventually managed to locate a guy that ripped and sold his own basswood strips. I think they will work much better.

Anyway, I needed a little more than 500 ties so I brought out my NWSL Chopper and started to cut away.


and after about an hour it was all done


The next step would of course be to glue down the ties on the roadbed. When building the turnout I downloaded a turnout template from Fast Tracks, printed it and used as a template when laying the ties and the track. Now I did however not want to glue paper on top of the bitumen since I was afraid that the glue and the paper would in some way form a seal and turn the bitumen into a sound box. The opposite of why I used the bitumen in the first place.

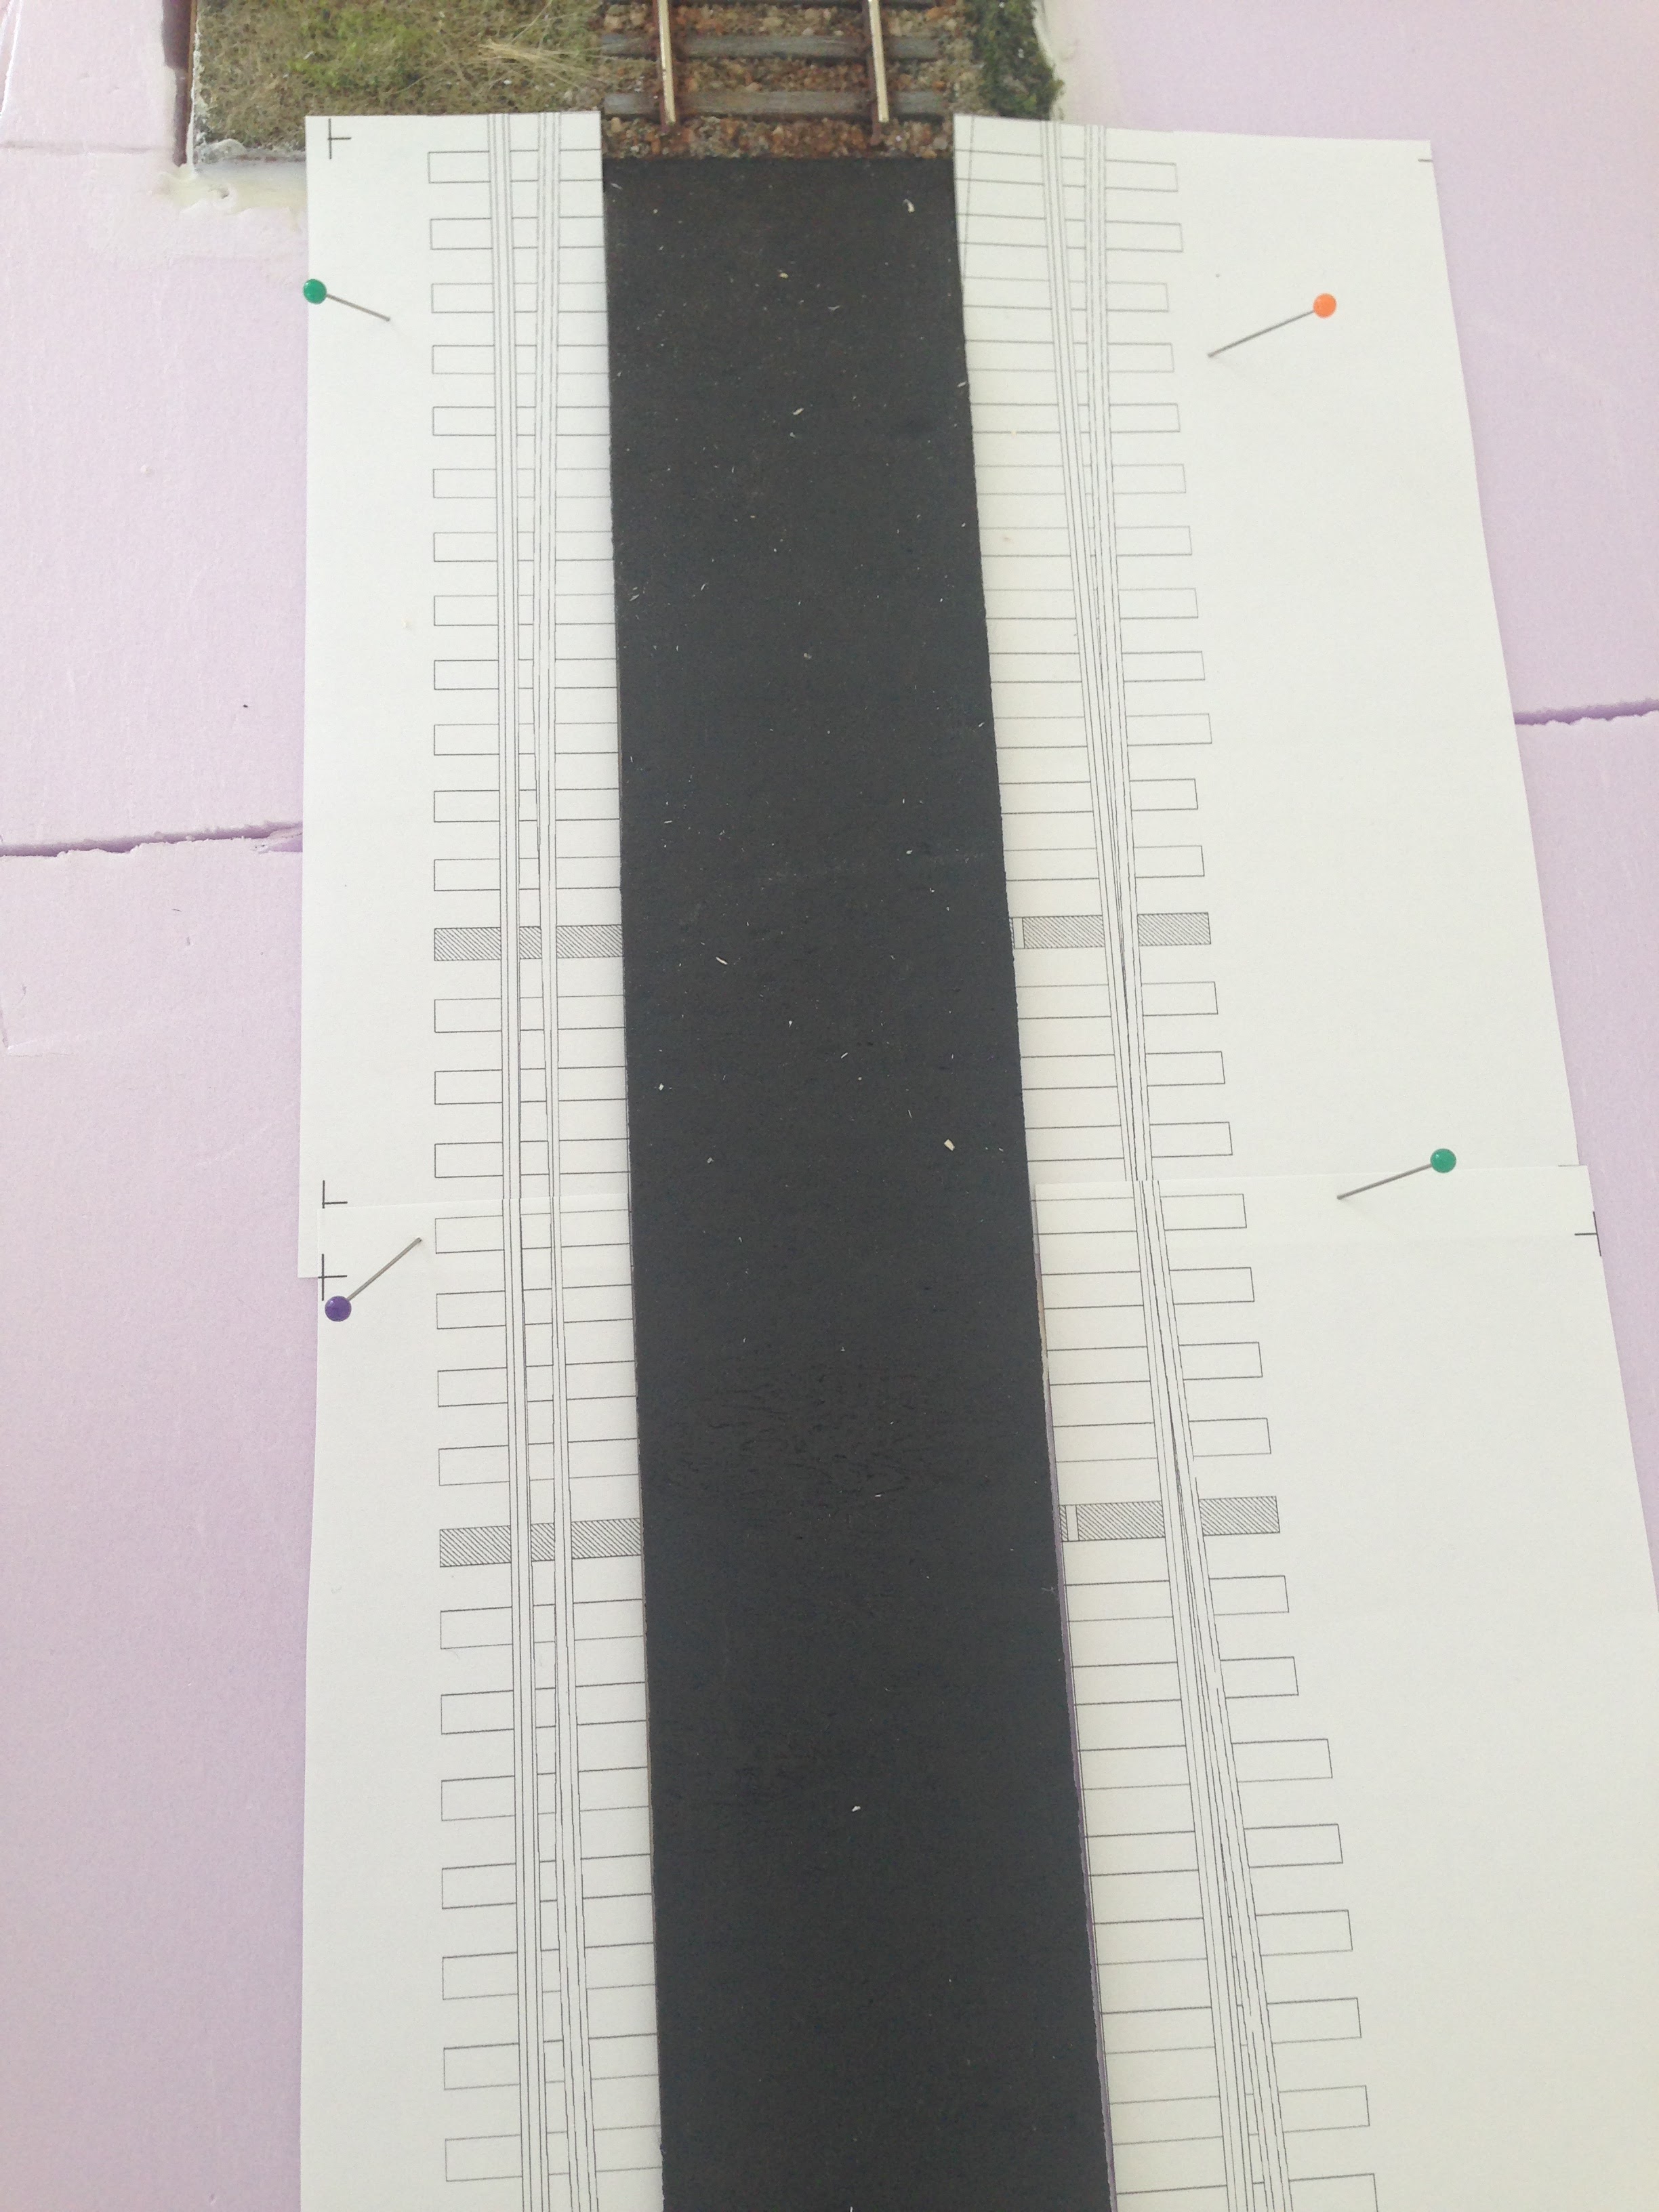
I still printed a section of a Fast Tracks turnout template but cut it in half length-wise. I then pinned one half on each side of the bitumen roadbed, like this:


I could then easily locate each tie, using the paper templates as an aiming tool. I spread white glue on the roadbed with a brush, and then simply put each tie down in the glue, one by one.


When I reached the end of the templates, I just repositioned them further down and continued from there. A little extra care was needed when the roadbed curved, since the ties had to be spaced further apart on the outer side of the curve.


Soon enough all ties had been laid for the first stretch of track.


Wednesday, July 1, 2015

Laying Bitumen Roadbed

The next step was to install the the turnout assembly. It needed to come down a bit into the foam, so that the turnout track and the new track will end up at the same level. After some work with a saw, a utility knife and some sanding paper I arrived at this.


The turnout assembly in place.


With the turnout finally where it belongs, and the track at the correct level, I proceeded by cutting bitumen mats into strips, the width of a tie (I wrote about the bitumen mats in a previous post). The bitumen is self-adhesive and it stuck fine to the foam.


Monday, June 22, 2015

A New Switchstand

The switch stand I had installed was from Grandt Line. It was a good looking plastic switch stand, and it could actually move the points. But it did not lock the points in place, and being plastic it felt a bit vulnerable. So I sat out to find something else, and finally found a brass switch stand from Red Cliff Miniatures.

After quite a bit of fiddling I managed to install it, and have it move and lock the points. The hard bit was to get the point end of the throw-rod to move just as much as needed to move the points, and at the same time allow the switch stand end to move a larger distance in order for the handle to reach the position where it locked.

Red Cliff Miniatures has a solution for that problem - a throw bar with a spring that takes up the excess movement. But I did not want to use it since it would look out of place and non-prototypical. Instead I managed to construct a two part throw-rod where a "hook" in one part could slide inside a groove or run in the other part.

Here is the new switch stand installed, painted and weathered.


Points are thrown by lifting the handle, turning it, and lowering it back into the locked position.


Saturday, June 13, 2015

Bitumen

I have heard that track laid straight on foam causes a lot of noise from the trains. So even if I do not want much of a roadbed profile I think I need some kind of noise dampening to go under the rails. I am also afraid that the foam will not withstand the pressure when spikes are driven into the ties, so I want something between the ties and the foam for that reason also.

I then came to think about an article by Pelle Soeborg in MR a few years ago, where he showed how he used bitumen mats as a sound dampener. Bitumen, as in the stuff used for sound dampening in for instance cars. Since I have no experience of bitumen I did not know if it would be soft enough to drive spikes through it, and at the same time not being to soft so it would do not do any good when it came to protecting the foam.

Well, I simply had to try it out to find out! So I went to an auto parts dealer (Biltema here in Sweden) and bought a pack of 4 bitumen mats. Here it is.


It turned out it is soft enough to cut with a knife, and also soft enough to drive spikes into. It also seems stiff enough to protect the foam from the pressure from the spike driving process. Here is a slice of it, the same width as the track and ties.
 
 
A successful test so far.

Saturday, June 6, 2015

New wheels

I have know received the new /115 thread wheels from North West Short Line, along with matching bushings. Dave at NWSL was very helpful. I just told him what I wanted to achieve, and he suggested suitable parts. Thanks Dave.


To be up and running again (pardon the pun) was a simple matter of removing the old wheels and bushings from the axles, and sliding (or pushing rather) the new ones on. Some careful track gauge matching got them rolling nicely through the turnout.

New wheels to the left, old to the right.


Test roll.


The new wheels are pre-weathered which was an improvement in itself.


A nice fit between the guard and stock rails.


Posing on the new shelf. The turnout assembly will not sit on top of the foam, but will be lowered into it, while new track will be laid on the foam.

Saturday, May 23, 2015

Building a shelf

Now that I have an O scale turnout and a car to go with it, I might as well realize that I want to go further down the O Scale path. So I went ahead and threw out my never finished H0 Three Yards Yard layout. I have not done anything on that layout for a year and a half! That if anything should have been an indication of that I had lost interest and needed to start on something new.

Well, with that one gone I had an empty wall with already mounted wall bands for an Elfa shelf system. Those are wall bands left there from my former Tehachapi Summit layout (Comment 17 September 2022: the blog describing this layout no longer exists). Since I had brackets laying around as well, getting a new shelf up would not be problem.

But I started by attaching my old backdrop, used both on the Summit and Three Yards Yard layouts, as seen in the picture below. It needs a fresh coat of paint, but apart from that it was all ready to go.


Next I built the shelf itself. I wanted it to be light-weight and slender looking. What I did was to attach a frame of 8 mm x 67 mm (1/4" x 2 3/4") lumber around a layer of 50 mm (2") extruded foam. And that was it. A sturdy but where light shelf, placed on the brackets. Like this:


It is no problem to just lift it off the brackets and down to the cupboards below when I shall work on it, if I find its normal height to awkward.


Friday, May 15, 2015

The O scale turnout gets company

I could not resist the urge to see some rolling stock accompany the newly built O scale turnout. So I ordered an Atlas Master series PS-4427 low side hopper which arrived today. O scale really is  impressive!

Click to get a closer view


As expected, the gauge is "correct", in the sense that the car and the track "agree" on it, but the car cannot negotiate the guard rails. Also as expected, since the guard rails are more on Proto:48 distance from the stock rail. I want to keep it that way since it looks a lot better. As a consequence, if I am serious about getting the car to roll through the turnout, the next step is to order some replacement wheel sets.

But the bearing caps are actually rotating! Cool!