Today I finally got around to building one of the warehouses. Well, at least I started the work that would eventually replace this mock up with the real thing.
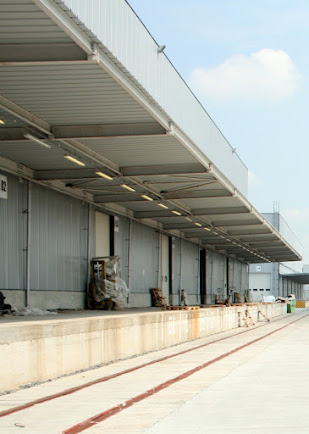
The look I am after is something like this.
Not exactly that, but along those lines anyway. I started with the foundation and the platform, which I built by laminating a piece of 3.5 mm tempered hardboard on top of a piece of 10 mm MDF board. I cut both pieces from some leftover material I happened to have lying around. By laminating these two pieces I would arrive at a suitable platform height (about 4 ft, when the bottom of the structure is brought up to the sub road level). This would also mimic the layered concrete construction you see in the above picture. Here are two construction photos.
Next I marked the location of the front wall and the three doors. Using these locations I cut and glued wood braces in place. These will later hold the walls in place. It did not put any braces at the positions of the doors, since I wanted to be able to model one or several of the doors as being open.
I then cut three holes in the warehouse platform/foundation, inside the building. Two of them to accept wooden dowels fastened in the bench work. That way I can have the building removable, but when on the layout, it will still sit tightly exactly where it belongs. The third, larger, hole is for the wires of any possible future lighting.
Next picture shows a piece of cork attached to the foam in order to get he bottom of the warehouse foundation at the correct level. You can also see the two wooden dowels, which matches the two smaller holes in the foundation.
After that I turned my attention to the front and side walls. As you can see in my "inspirational" prototype picture above, the lower parts of the walls are of concrete. I decided to model those using 1mm (0.040") plain styrene sheet. Although mostly invisible, I made these concrete/styrene walls as high as the complete building, for additional strength. In real life the concrete walls are much lower, just being a foundation for some kind of structure that holds the visible sheet metal.
Here are the styrene walls in place. To avoid having to fuss with cutting door openings at this stage, I simply did not put any of these "inner" walls at the door locations.
Wrapping up this first part of the warehouse build I gave the whole thing a coating of gray (from a can). The idea being this would be a good start for the concrete platform and the warehouse floor. Now, the gray turned out to be too dark, so I have to come up with something better if I want it to look like concrete. Also, the paint raised some "burrs" in the wood which must be sanded down.
One more thing. I sprayed the inside black. This will make it harder to actually see that there is not much stuff inside (if I decide to leave a door open), and hopefully also stops light leaks (if I decide to put any lighting in). At a later stage I will also put in a back wall, which will also be painted black.
Thanks for watching.


No comments:
Post a Comment